How To Create an eLearning Course: A Comprehensive Content Development Guide

eLearning Course tips eLearning Course strategies
eLearning Course
elearning Content

Source

Do you know what the future of eLearning courses looks like? According to GlobalNewswire, the eLearning market is expected to reach $457.8 billion by 2026. It’s no longer just about creating educational training materials—it’s about designing immersive, engaging experiences that lead to real-world results.

As the demand for eLearning courses grows, the focus is shifting from traditional methods to lively content that truly connects with learners.

In this blog, we’ll examine how content development for eLearning courses is changing and what it takes to create inspiring training courses.

Ready to improve your training programs? Here are a few steps to get you started!

Step 1: Define Your Learning Goals

Before diving into the content development process, you must clearly understand what you want your learners to achieve. To define learning goals effectively, start by asking yourself:

  • What is the main objective of this course?
  • What do I want my learners to achieve by the end?

The purpose of your course should guide the structure and content. Is it to teach new skills, help learners pass an exam, or perhaps offer knowledge about a specific topic? This will provide the clarity needed to set precise goals.

Should the Goal Be Broad or Focused?

When it comes to defining your eLearning course goals, it’s crucial to strike a balance between broad and focused objectives. If your goal is too broad, learners may struggle to see clear takeaways from the course.

On the other hand, overly focused goals can limit the scope of learning, leaving your course too narrow to engage a variety of learners.

elearning Content

What’s the Best Approach?

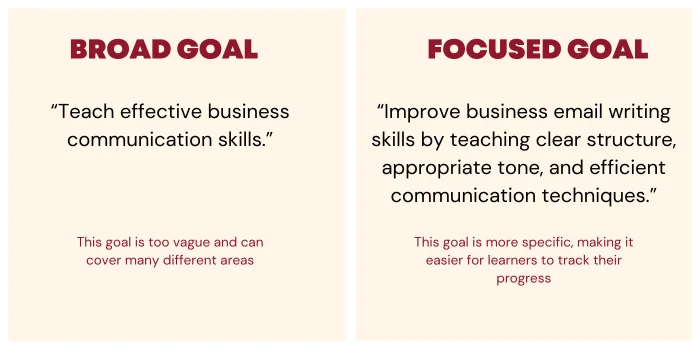
In general, it's a good idea to start with a broad goal and then narrow it down into more specific, focused objectives. This allows you to create a course that balances both comprehensive learning and practical, measurable skills.

For example, if you start with a broader goal like “To improve communication skills in a professional setting,” you can break it down into focused, measurable objectives like:

  • “Learn how to write professional emails with proper formatting and tone.”
  • “Master the basics of making effective presentations.”
  • “Develop strategies for active listening in business meetings.”

Step 2: Understand Your Learners

Knowing who your learners are is a crucial part of course design.

  • Are they beginners or experts?
  • Do they have any prior knowledge of the subject?
  • How many learners will be participating in the course?
  • What are their job roles or positions (e.g., sales representatives, customer service agents, HR professionals, etc.)?
  • What are the learners' demographic details (e.g., age range, education level, geographic location, computer skills, devices they use, etc.)?
  • Are there any learners with disabilities or specific needs to consider?

The answers to these questions will influence how you structure your course, the language you use, and the type of content that will be most effective.

At Lexiconn, we recommend gathering insights into your audience’s preferences, challenges, and learning styles. This will help you build a course that is not only informative but also resonates with them.

elearning Content

Source

Step 3: Develop the Course Structure

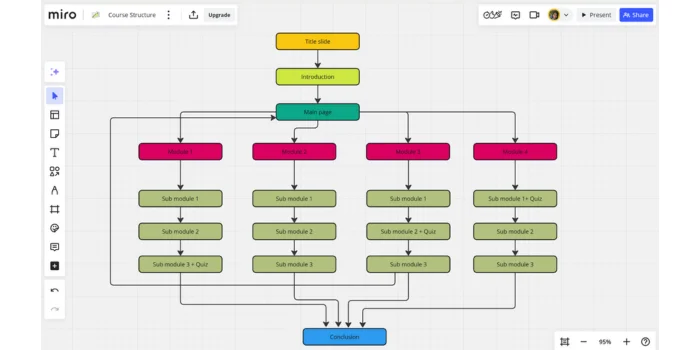
Once you’ve set your learning goals and understand your audience, the next step is to develop the structure of your course. This is where the outline of your developed content comes to life. A well-organized structure can make the learning experience smoother and more enjoyable. You can use tools like Miro to structure your course.

Here’s a general breakdown of what the structure could look like:

1. Introduction

The introduction is your chance to grab learners' attention and set the stage for what’s to come. It’s essential to be clear and engaging from the start. In this section, you should:

  • Provide an overview: Outline the course objectives so learners understand what they’ll be learning and how it will benefit them.
  • Establish the relevance: Make it clear why the topic is important. Relating the course content to real-world scenarios to increase their motivation.
  • Set expectations: Explain what learners can expect in terms of time commitment, structure, assessments, and any required materials.

Tip: Start with a few relevant quotes or insights that capture the essence of the topic. For example, use quotes that highlight the subject's importance or impact in real-life scenarios. This can create an immediate connection and encourage learners to see the value in what’s to come.

2. Modules or Lessons

This is the heart of your course. Breaking the content into training modules or lessons makes it easier for learners to digest and stay engaged. A typical training module structure could include:

  • Clear objectives: Each training module should start with a set of learning objectives that tell the learners exactly what they will learn by the end.
  • Concept-focused lessons: Focus each lesson on one core concept or skill. Avoid overwhelming learners by introducing too much information at once.
  • Varied content formats: Plan to include a mix of text, images, videos, and interactive elements like discussion boards, simulations, or case studies. This will address different learning styles and keep things interesting.

3. Assessments and Quizzes

Including assessments at key points throughout the course helps to:

  • Reinforce learning: Quizzes or knowledge checks after each training module ensure learners are retaining the material before moving on.
  • Provide feedback: Offer immediate feedback to help learners understand where they went wrong and how they can improve.
  • Track progress: Frequent assessments help you gauge the effectiveness of the developed course content and make adjustments if necessary.

4. Conclusion

The conclusion is your final opportunity to ensure learners walk away with key takeaways and a sense of accomplishment. Here, you should:

  • Summarize the main points: Briefly recap the essential concepts and skills covered throughout the course.
  • Reinforce the course goals: Remind learners how the course has helped them achieve the learning objectives set out at the beginning.
  • Provide next steps: Offer guidance on how learners can apply what they’ve learned in the real world. If relevant, suggest additional resources for continued learning.
  • Include a final assessment: This could be a final quiz or assignment to measure the learner’s overall mastery of the course content you developed.
  • Certification: If applicable, provide information on how learners can obtain a certificate or proof of completion.

Step 4: Work on the script

With the course structure in place, it’s time to craft a detailed script, which will serve as the foundation of your eLearning content. The script guides both on-screen text and any narration, shaping how information flows and how learners interact with the material.

A well-written script transforms the subject matter into engaging, accessible content, making it easy for learners to understand and retain key concepts.

There are two types of scripts often used in eLearning: on-screen text and narration script. Let’s go over the best practices for each.

elearning Content

On-Screen Text

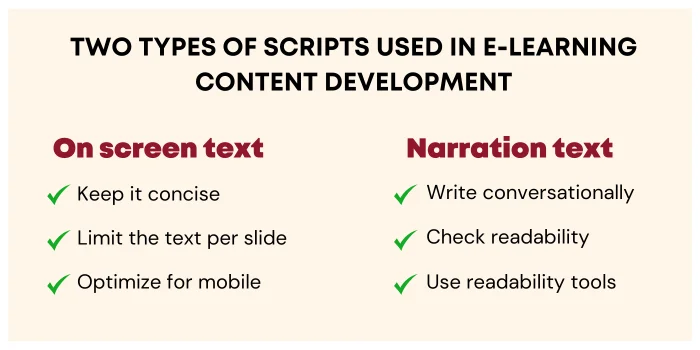
The on-screen text is all the text that appears directly on slides, so it’s essential to keep it focused and easy to read. To make on-screen text effective, consider these points:

  • Keep it concise: Each slide should highlight only core concepts. If extra information is needed, consider including it as a voiceover or supporting visuals like infographics or videos. Overloading slides with text can make them feel dense and hard to follow.
  • Limit the text per slide: People engage better with small chunks of information, so avoid large blocks of text. Aim for short, direct sentences, and keep each line within a 40-character maximum for clarity. A good rule of thumb is “one slide, one main idea.”
  • Optimize for mobile: Many learners access training courses on tablets or smartphones, so ensure your text size and formatting are easy to read on small screens. Always test your slides on various devices to confirm visibility and readability.

For example, if you’re developing a content slide on “Customer Service Basics,” a single bullet point like “Listen actively to understand customer needs” is clearer than a long, descriptive paragraph. Supporting graphics or icons can make the idea even easier to grasp.

Narration Script

If your eLearning course includes voiceover, the narration script should sound conversational and easy to follow. This isn’t just text to read; it’s spoken content developed to engage listeners. A successful narration script will feel like a friendly guide leading the learner through each section. Here’s how to create one:

  • Write conversationally: Use a casual tone, contractions, and simple phrases. Avoid jargon or lengthy, complex sentences. For instance, instead of “This training module will cover…” try saying, “Let’s get started with…” Transitions like “now that we’ve covered…” or “let’s dive into…” keep the flow natural and make the learner feel engaged.
  • Check readability by reading aloud: As you write, read the script aloud to make sure it sounds clear and natural. This helps you catch any awkward phrasing, complex terms, or lengthy sentences. If anything feels unnatural, simplify it or break it into shorter parts.
  • Use readability tools: Tools like the Hemingway App are great for refining readability, highlighting complex sentences, and suggesting simpler alternatives. This can be especially helpful in reducing passive voice or spotting terms that might confuse learners.

For example, if your script says, “We will now proceed to discuss the importance of communication in customer interactions,” a more listener-friendly version might be, “Let’s talk about why communication is key in working with customers.”

The on-screen text gives quick visual cues and supports the core ideas, while narration adds depth and a personal touch. Combining the two allows you to provide a richer, more interactive learning experience that can hold learners' attention and boost comprehension.

Step 5: Make Your eLearning Course Interactive

Learners are more likely to retain information if they actively engage with the content. This is where interactivity comes in. Interactive elements, like quizzes, drag-and-drop exercises, and role-playing scenarios, can significantly boost engagement.

elearning Content
  1. Add Assessments and Knowledge Checks

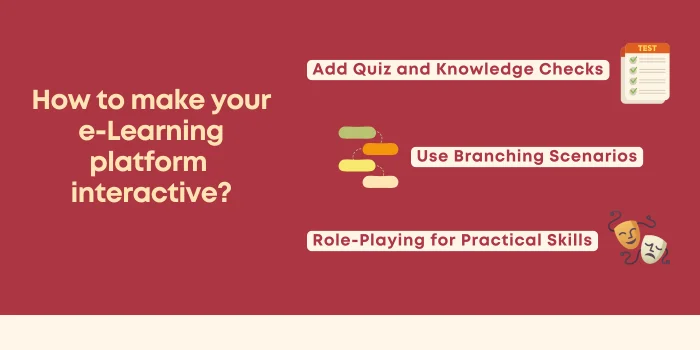
Quizzes and tests are crucial for evaluating learners’ progress and reinforcing what they’ve learned. But not all quizzes are created equal. To make assessments more effective:

  • Ensure relevance: Make sure the questions tie directly to the eLearning course content.
  • Provide instant feedback: After learners answer, give them feedback on why the answer was right or wrong.
  • Keep it engaging: Use different question types like multiple choice, matching, or fill-in-the-blank to keep things interesting.
  • Pop-up messages: When the learner gets an answer wrong, send a pop-up “Oops! Wrong answer!” along with a helpful tip to guide learners toward the right response. This small nudge can encourage learners to re-engage with the developed content and grow their understanding.

At Lexiconn, we often help design quizzes that align perfectly with the eLearning course material, ensuring they not only check knowledge but also support learning.

  1. Use Branching Scenarios

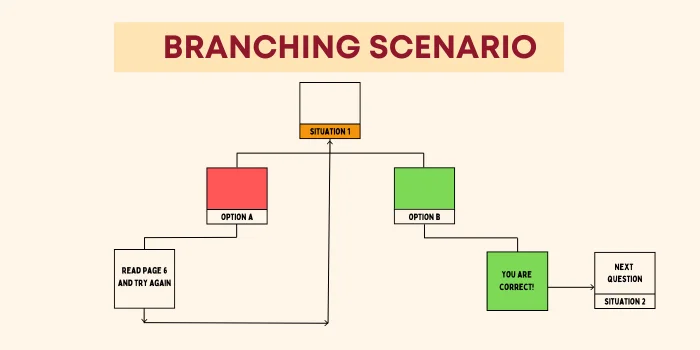
Branching allows learners to make decisions and see the consequences of their actions. For example, a sales training eLearning course might have a scenario where a learner has to choose the right approach to handle a customer complaint. Depending on their answer, they’re led down different paths that reflect the outcomes of their choices.

By integrating branching into your quizzes and assessments, you offer learners a more personalized, real-world experience.

How to Create Branching Scenarios?

To create branching in quizzes or assessments, you’ll need an authoring tool or platform that supports interactive or scenario-based learning, such as Articulate Storyline, Adobe Captivate, or H5P. Here’s a step-by-step guide to building a branching scenario:

1. Define Learning Objectives and Scenarios
  • Identify the key skills or decision-making abilities you want learners to develop.
  • Create realistic scenarios that reflect situations learners might encounter, like handling a customer complaint or solving a technical issue.
2. Outline Decision Paths and Outcomes
  • Map out the possible paths a learner can take based on their choices. For instance, if they choose "Option A," they go down one path, while "Option B" leads to a different outcome.
  • Decide on the consequences of each choice, whether it’s positive, neutral, or negative. Each path should provide feedback that helps the learner understand the impact of their decision.
3. Create a Storyboard and Script
  • Build a storyboard that shows each decision point and the resulting paths. This can be a simple flowchart showing each step, choice, and outcome.
  • Write scripts for each scenario and outcome, including dialog, questions, and feedback.
4. Build in an Authoring Tool with Branching Capabilities
  • In your chosen tool:
    • Add each scene or question as a slide or interaction.
    • Set up triggers or conditional logic for branching. For example, “If the learner selects Option A, go to Slide 5; if they select Option B, go to Slide 6.”
    • Use variables if your tool supports them, allowing choices made earlier to affect options or outcomes later on.
  • Link scenes to reflect the learner’s journey based on their choices.
elearning Content

Role-Playing for Practical Skills

One of the most effective ways to teach soft skills or customer interaction techniques is through role-play scenarios. Creating realistic dialogue simulations lets learners practice in a risk-free environment. It’s an ideal way to develop communication skills, whether in sales, customer service, or management training.

These interactive simulations engage learners and provide immediate feedback, allowing them to learn from their mistakes and successes.

Step 6: Create a Course Storyboard

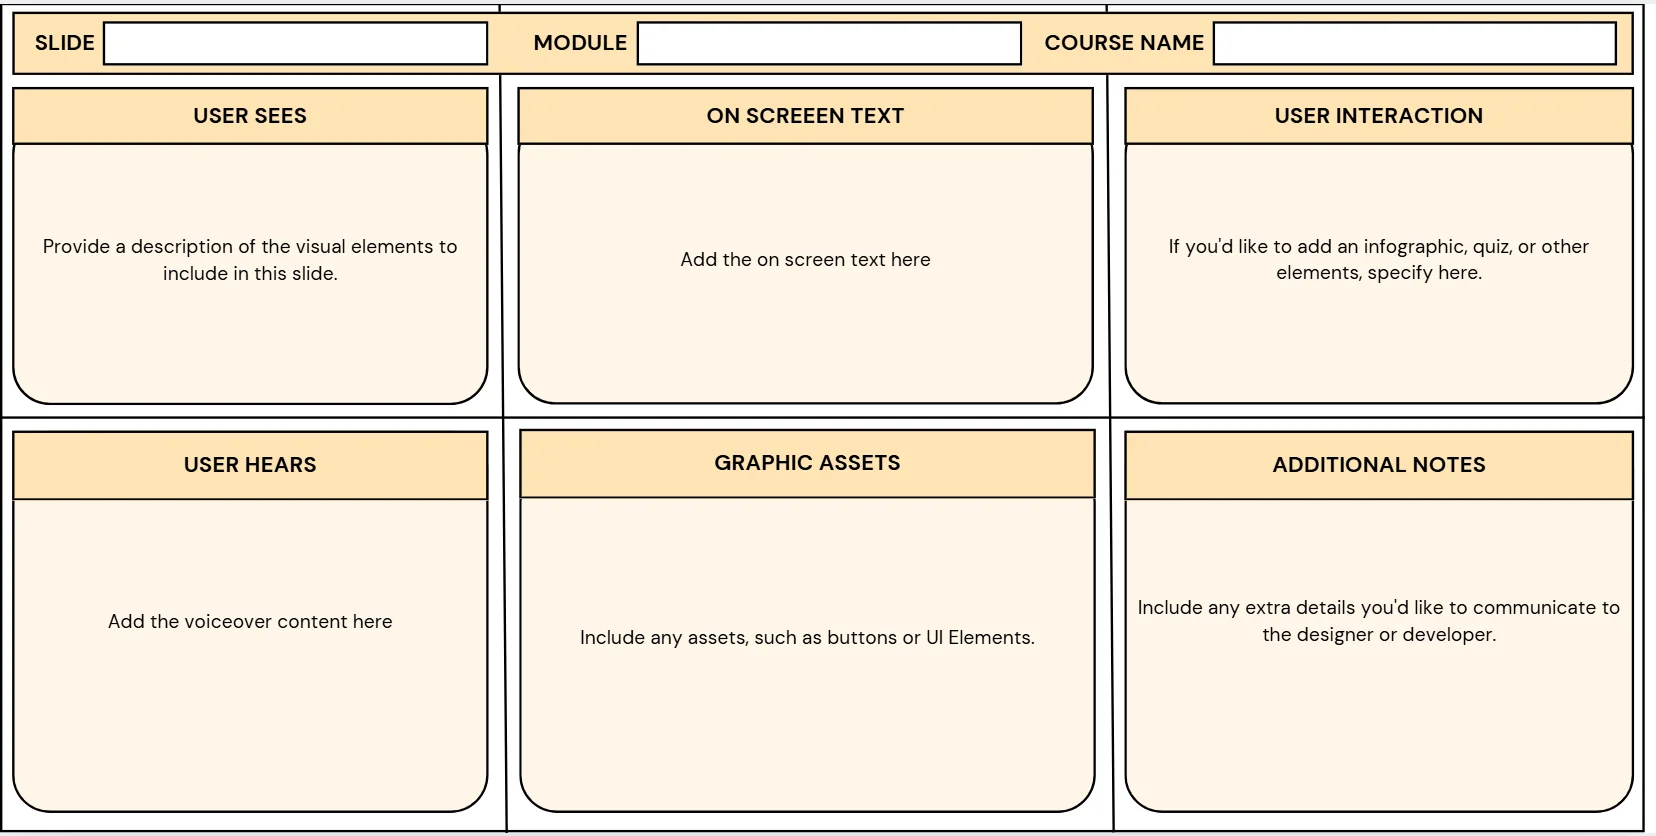
Creating an eLearning storyboard is crucial in developing effective and engaging content for an online learning course. It is a blueprint that bridges the gap between the developed content (script) and the design elements (graphics, visuals, audio). If you're new to storyboarding, don't worry!

Here's a step-by-step guide to help you understand the process in detail, with examples and suggestions to make it easier.

1. Gather Your Project Elements

Before you begin developing a content storyboard, you’ll need some foundational materials. Think of this as gathering your ingredients before starting to cook. The more prepared you are, the smoother the process will be.

Key Elements to Gather:

  • Completed Script: This is the text for your course, including what will be spoken (for voiceovers) and any on-screen text that learners will read.

For example, if you're teaching an eLearning course on customer service, the script will outline key phrases and dialogue that should appear on the screen or be narrated by a voice actor.

  • Must-Include Material: This could be any tables, charts, or videos that need to be incorporated into your course.

For example, if you’re teaching data analysis, you might need to include a chart showing different data trends.

  • Design Style Guide: This defines the look and feel of your course. It includes your brand’s color palette, fonts, and how your logo should appear. If you don’t have an existing style guide, create one that specifies how each visual element should be used across your course.
  • Design Prototype: A design prototype is a mock-up of your course. It helps you visualize how your eLearning course will look. If you have a sample slide designed, it will show how text, images, and videos should be arranged.

For example, it could show a slide with the text on the left and an image on the right, with the title at the top.

Once you have these materials ready, you can begin creating the storyboard with a clearer understanding of how everything will come together.

2. Create a Storyboard Template

A storyboard template helps organize your thoughts and ensures you don't miss any important details. It’s a tool that simplifies the process and allows you to quickly capture the necessary information for each slide. You can find free templates online, such as those in Word, PPT, or PDF formats, or create your own.

What Should Go Into a Template:

  • Slide Identifiers: Each slide needs to be identified. This includes the slide number, title, and the name of the program. For example, slide one might be titled "Introduction to Customer Service," and it will have a specific slide number to reference easily.
  • What the Learner Sees: This section describes what will appear visually on the slide. It includes text, images, animations, and graphics. For example, if the slide includes a chart comparing customer satisfaction scores, this would be noted here.
  • What the Learner Hears: If there’s voiceover narration, music, or sound effects, describe them in this section. For example, "Voiceover: 'Welcome to the course on Customer Service. In this section, let’s explore key skills.'
  • User Interaction: If the eLearning course includes quizzes or interactive elements, describe them here. For instance, "Question: 'What is the most important skill for a customer service representative?' Responses: A) Communication B) Time management C) Problem-solving. Feedback: 'Correct! Communication is key!'"
  • Additional Notes: This is where you can add any other relevant information, such as timing for animations, background music, or special instructions for developers. For example, you might note, "The animation should last 5 seconds before moving to the next slide."

3. Complete Your Storyboard

Now that you have all the necessary pieces start filling out your storyboard. For each slide in your course, you’ll create a separate storyboard page. For simple slides (e.g., title slides), include just the text and any fixed design elements.

For more complex slides, like scenario-based learning, you might need to include multiple elements: the dialogue for characters, the actions they’ll take, and what will appear visually on-screen.

Example of a Complex Slide:

Let’s say you're building a scenario-based slide where learners must choose how to respond to a customer complaint. The storyboard for this slide might include:

elearning Content
  • Slide Identifiers: Slide 3 – "Handling Customer Complaints"
  • What the Learner Sees: The screen shows a customer on the phone with a frustrated expression. Text: "The customer is unhappy with the service."
  • What the Learner Hears: Voiceover: "The customer says, 'I’ve been waiting for an hour, and no one has helped me!'"
  • User Interaction: Multiple-choice question: "How would you respond?" Options: A) "I’m sorry to hear that, let me assist you now." B) "That’s not our fault." Feedback: "A is correct. Always apologize and offer assistance."
  • Additional Notes: "The animation should fade to the next question after 10 seconds."

Step 7: Choose the Right eLearning Tools

The right tools can make a huge difference in how your content develops. If you're looking for tools to help create your eLearning course, Lexiconn can assist with writing all the textual content while ensuring it's optimized for both engagement and SEO.

But when it comes to tools for building the eLearning course itself, you’ll want to look at authoring software that suits your needs. These tools allow you to put together a professional-looking eLearning course easily. Here are some of the most widely used eLearning authoring tools:

  • Learning Management Systems (LMS): like Moodle, Canvas, and iSpring.
  • Content Development Tools: like Articulate Storyline, Camtasia, and Adobe Captivate.

Step 8: Mobile Optimization and Accessibility

It’s important to make your eLearning courses accessible to as many learners as possible. That means ensuring the developed content is mobile-friendly and accessible to people with disabilities.

  • Make it mobile-ready: Ensure the eLearning course design adjusts for different screen sizes and devices.
  • Ensure accessibility: Add features like captions, transcripts, and screen-reader compatibility.

This will help meet legal requirements and ensure a better experience for all learners.

Step 9: Publish and Distribute Your Course

Once you’ve developed and tested your eLearning course, it’s time to publish. Depending on your distribution goals, you’ll need to choose the right format.

  • LMS (Learning Management Systems): Publishing to an LMS allows you to track learner progress and completion for corporate training.
  • Web-Based: HTML5 is your best bet if you’re targeting a larger audience or offering an eLearning course for sale.
  • Video Platforms: If your course is heavily video-based, platforms like YouTube or Vimeo can be a great option.
    • With Lexiconn's experience in content development, we can help you optimize your eLearning course materials for whatever learning platform you choose, ensuring they reach your intended audience effectively.

      Conclusion

      Developing content for an eLearning course can seem overwhelming at first, but with a clear plan, the right tools, and effective content, you can develop an eLearning course that engages learners and delivers measurable results.

      At Lexiconn, we’re here to help you through the content development process. We assist in writing engaging learning materials, designing assessments, or ensuring your course is accessible and mobile-friendly.

      Experience our e-learning content with a free pilot to see the results firsthand. You can also schedule a free 30-minute consultation to explore the different types of e-learning modules we can design for you. Try it out and discover how we can develop your training content to be engaging and impactful!

I have read and accept the Privacy Policy

Read More Content agency
Book a Meeting